Imagine soaring through the skies and unhindered by the obstacles in your path. All while gaining a fresh perspective on the Rust game map. The Rust fly command enables you to do just that – navigate the game world freely and efficiently, making it an essential tool for Rust server admins.
This comprehensive guide will discuss the Rust fly command and related noclip commands. We will delve into admin authentication, server console access, and additional console commands for enhanced gameplay.
Understanding the Rust Fly Command
The Rust fly command is a powerful tool that lets players navigate the game map without obstructions. It allows them to explore the game world freely and effectively. This command is executed in the server console environment and is one of the admin commands that can be used in the game.
Gaining a better understanding of the Rust fly command and its related features. Such as the noclip command and admin authentication, will help you unlock the full potential of your Rust gaming experience.
The Noclip Command
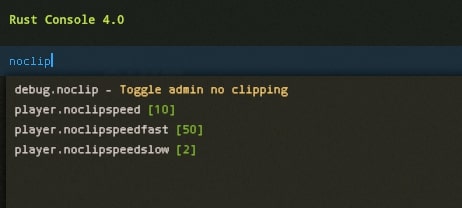
The noclip command in Rust is a powerful tool that allows administrators and moderators to move freely in a 360-degree radius without being hindered by the game’s geometry.
This command can manage the game environment and is especially useful for admins and moderators. Especially the ones who need to move around the game map quickly and easily.
To enable the noclip command, enter “bind l noclip” into the console, letting you traverse the game map in God Mode without obstructions. This command can be used on both vanilla Rust servers and modded servers, providing increased versatility and adaptability for different gaming setups.
Admin Authentication and Permissions
Admin authentication and permissions are crucial in maintaining a well-functioning Rust server. They regulate who is granted access to specific commands and features within the game.
To access the Rust fly command, administrative authentication, or authentication level 2, is required. Only authorized users can execute these powerful Rust commands and maintain a balanced gaming experience.
The Godmode uMod plugin gives Rust server admins the command syntax to grant god mode privileges to other players. Enabling more precise control over the game environment.
By understanding and managing admin authentication and permissions effectively, you can ensure a smooth and enjoyable gaming experience for all players. And this is while retaining control over the game’s essential features.
Accessing the Server Console in Rust
Opening the Rust server console is straightforward – press the F1 key on your keyboard to access it. Administrators and moderators are the primary users of console commands in a Rust server, although some servers may also permit players to use console commands, albeit less commonly.
The server Rust console provides a wealth of information and commands, enhancing the gaming experience for admins and players.
Opening the Console
Once you’ve opened the console by pressing F1, you can access various commands, such as the noclip command, teleportation commands, and jump height modification. These commands can greatly enhance gameplay, allowing players and admins to customize their in-game experience to suit their needs.
To enable a specific command, type the desired command into the console and press enter to enable a specific command. For example, to assign the “noclip” command to the “L” key, you would enter “bind L noclip” into the console. This opens up a world of possibilities for customizing your Rust gameplay.
Console Echo and Error Messages
Console echo messages are essential in understanding and managing the Rust server console. These messages are printed to the console using methods such as console.log(), allowing for the output of text or variables to the console for debugging or informational purposes. Console echo messages help admins and moderators keep track of server activity, ensuring a smooth and well-functioning gaming experience.
When handling errors with console echo messages, it is recommended to utilize the console.error() method to output the error message to the console. By understanding and effectively managing console echo and error messages, admins and moderators can maintain a stable and enjoyable server environment for all players.
Activating and Deactivating Rust Fly Command
Activating and deactivating the Rust fly command, including enabling god mode and binding the noclip command, is a simple process in the game’s manual. The first step is to open the in-game console by pressing F1.
Once the console is open, you can enable or disable the Rust fly command and the associated god mode and noclip command by typing the appropriate command into the console and pressing enter.
Enabling God Mode
To enable god mode in Rust, open the in-game console first by pressing F1. Then, simply type the command “God” into the console and press enter.
This will toggle god mode on or off for your character, allowing you to become invulnerable to damage and enjoy the benefits of unrestricted movement in the game world.
Bind L Noclip
Binding the noclip command to the “L” key is an efficient way to activate and deactivate the command quickly while playing Rust. To do this, open the console in Rust by pressing F1. Then, type “bind L noclip” into the console and press enter.
Now, whenever you press the “L” key, you will toggle the noclip command on or off, allowing you to move freely through the game world without obstructions.
Additional Rust Console Commands for Enhanced Gameplay
In addition to the Rust fly command and noclip command, numerous other console commands can further enhance your gameplay experience. These commands include teleportation, jump height modification, and more.
By familiarizing yourself with these additional Rust console commands, you can customize your gameplay experience and tailor it to your preferences.
Teleportation Commands
Teleportation commands in Rust are convenient for moving around the game world quickly and efficiently. Commands such as “teleport [playername],” “teleport.topos”, and “teleportlos” allow you to teleport to a specific player, a specific position, and the closest object in your line of sight, respectively.
Additionally, a basic teleport command takes you to the longest active player on the server. These teleportation commands can greatly enhance your in-game mobility and provide new ways to explore the Rust game world.
Jump Height Modification
Modifying jump height in Rust can unlock new gameplay possibilities and allow you to access previously unreachable areas. The console command “physics.steps 60” increases your character’s jump height, allowing you to jump higher than before.
To reset your character’s jump height to the default value, use the console command “physics.steps 0”. Experimenting with jump height modification can lead to new gameplay strategies and a more dynamic Rust experience.
Managing Users and Banned Players
User management in Rust is essential for maintaining a well-functioning server and enjoyable gaming environment. Effective user management includes creating, modifying, and deleting user accounts, assigning roles and permissions, and implementing secure authentication and access control measures.
Monitoring Player Activity
Monitoring player activity is an important aspect of managing a Rust server. Utilizing tools like logs, analytics, and other monitoring software can help you track who is playing the game, how long they are playing, and what they are doing in the game.
The Player Administration plugin is a useful tool that allows admins to moderate users and monitor player activity through a graphical user interface (GUI). By closely monitoring player activity, admins can maintain a balanced and enjoyable gaming environment for all players.
Handling Banned Users
Managing banned users is an essential aspect of maintaining a well-functioning Rust server. The process involves identifying the user, assessing the cause of the ban, and executing the necessary action. Such as blocking the user from the game, suspending their account, or permanently banning them.
Monitoring banned users can be achieved through the in-game console. Using commands like “banlist” to view a list of all banned users and the reason for the ban. By effectively handling banned users, admins can maintain a safe and enjoyable gaming environment for all players.


